WordPress is Easy
Built by our expert developers, your WordPress site will make managing your website fast, painless, and easy. We put the power to make site updates right at your fingertips. Update inventory, change your hours, and post a promotion right in your browser.
Table of Contents
- What is Content Management?
- Logging In
- The Dashboard
- RV Listings
- Site Settings
- Page Fields
- Basic Page Management
- Form Entries
- Styling
- Notes
What is Content Management?
Content
Throughout this training manual we will refer to the content of your site. Content is a broad term for the images, text, links, and any other interactive element contained within your site. Properly maintained content is the key to optimizing your site’s search engine ranking, giving it a better chance of appearing near the top of search results.
Content Management
Content Management involves making decisions, creating, and organizing content. You can create, edit, move or delete items within your site. We create a structure to get you started, but it takes ongoing effort to rank well in search. Our system is designed to easily aid in this process, and can be accessed from any modern browser, wherever you are.
Good Content
A prime page contains about 500 words, with at least 4 of them being unique keywords used at least 2 to 3 times each, preferably more. A keyword is a word or phrase in your content that makes it possible for people to find your site through a search engine like Google.
For inventory, good content means complete listings: every field filled in, a full set of photos, and a description written for the buyer. A listing with 20 photos and a real description will outperform one with a single photo every time.
Another aspect of optimized content is internal linking. This is when you reference something on one page of your site, and link it to another page of your site. It is important to link the actual words that describe the page you are linking to, as opposed to something like “Click Here”. For example, if you’re mentioning mobile service, link the words “mobile RV service” to the Mobile RV Service page rather than saying “Click here to learn more.”
Bad Content
Bad content is any combination of too few words, limited use of keywords, few or no images, and outdated information. On an inventory site, the most common culprit is a unit that has sold but is still listed. It is important to monitor your site for these types of weak pages, as they hurt the overall effectiveness of your site.
Logging In
Logging into WordPress is a simple process.
- WordPress backend management is a short addition to your site’s URL.
- To login, type your username and password in the described fields.
- (If having issues, use the “Lost your password?” system)
- Click the “Log In” button.

The Dashboard
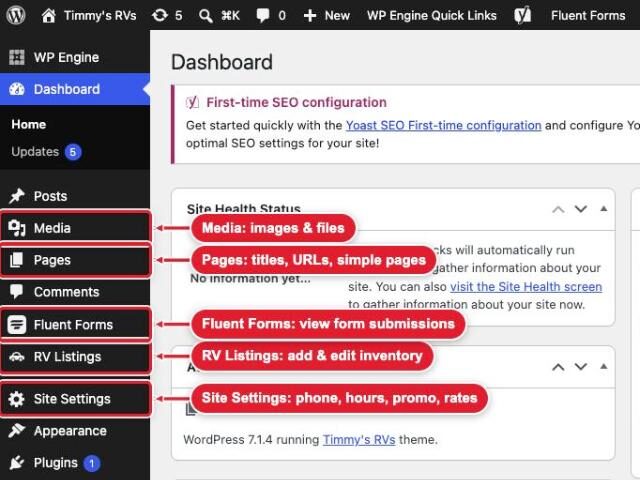
After logging in, you will see the dashboard of your site. This area gives you an overview of your site and access to the intricate workings of the site.
These are the areas you will use most:
- RV Listings: Add, update, and remove inventory (see RV Listings)
- Site Settings: Phone, hours, promo message, service rates, and homepage photos (see Site Settings)
- Fluent Forms: View contact, service, sell/consign, and employment submissions
- Media: Manage images and files in the Library
- Pages: Manage page titles, URLs, simple text pages, and page fields like FAQs, storage pricing, and team members (see Page Fields)
RV Listings
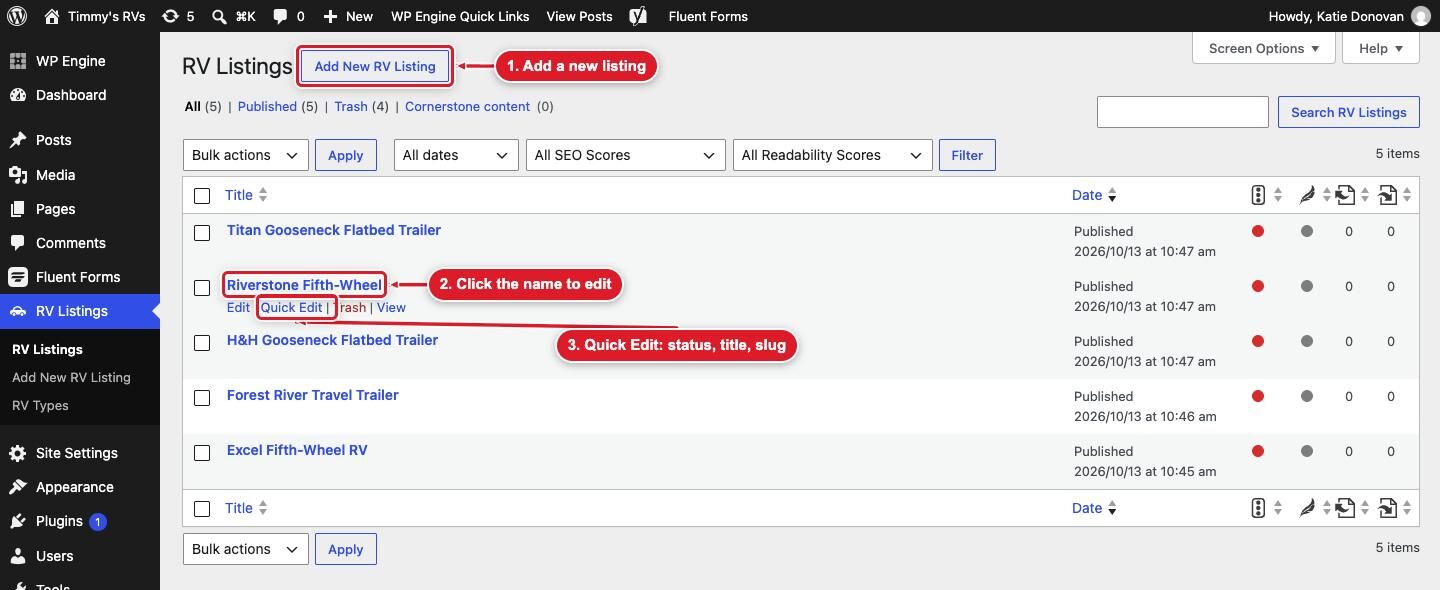
Every unit on the Shop page is an RV Listing. Add a listing once, and it appears in the Shop, in its category filter, in “Similar Units” on related listings, and on the homepage if you feature it.
Add a Listing
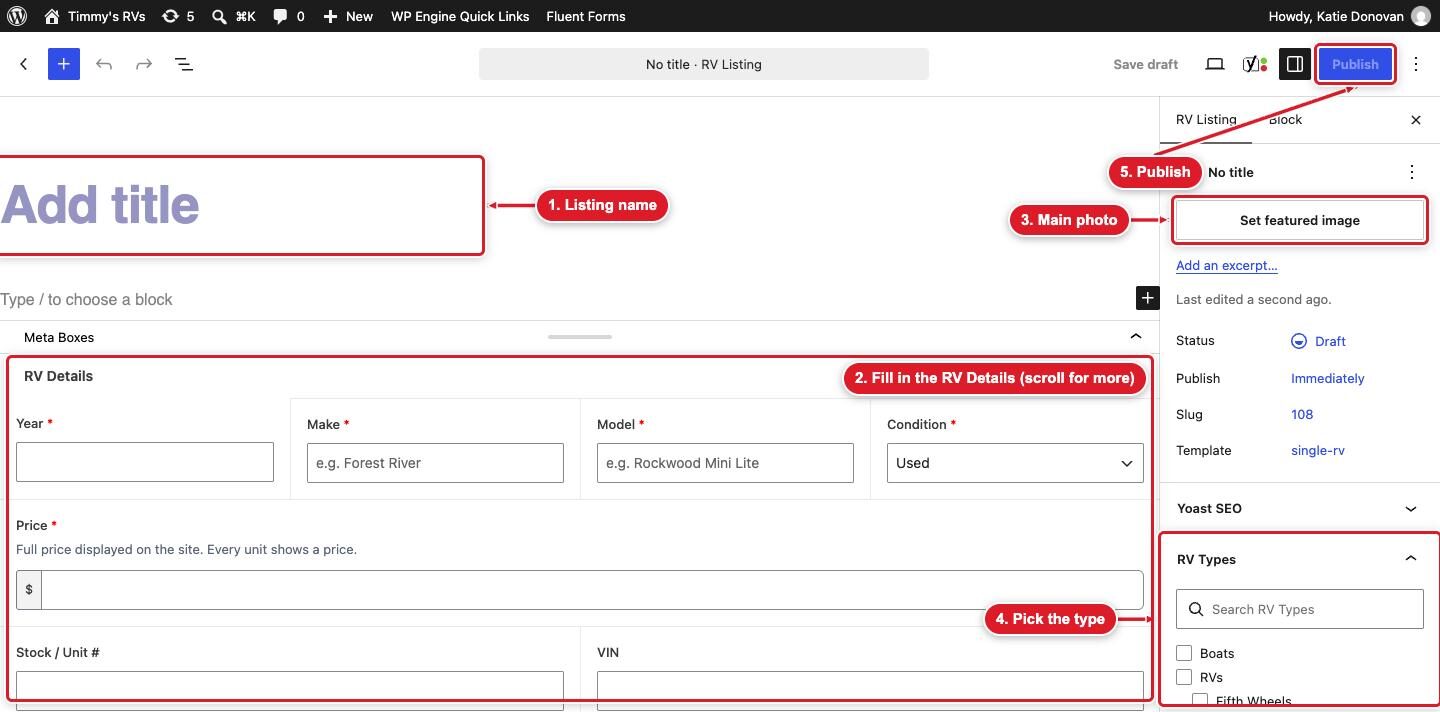
- Go to RV Listings > Add New RV Listing.
- Enter the listing name in the title field at the top. Example: Forest River Travel Trailer
- Fill out the RV Details fields below the editor:
- Year, Make, Model: Required. Make feeds the Brand filter on the Shop page, so keep spelling consistent (always “Forest River,” never “Forrest River”).
- Condition: New or Used
- Price: Full price, numbers only (no $ or commas). Every unit shows a price.
- Stock / Unit # and VIN
- Description: The detailed write-up shown on the listing page
- Specifications: See below
- Photo Gallery: See below
- Video URL: Optional YouTube or Vimeo walkthrough link
- Featured on Homepage: Check to show this unit in the Featured Inventory section on the homepage
- In the right sidebar, under RV Types, check the category the unit belongs to. This controls which Shop filter it appears under.
- Click Set featured image in the right sidebar and choose the main exterior photo.
- Click Publish.
Specifications
Specifications display as a spec table on the listing. Click Add Spec for each spec, then fill in the Label and Value.
- Common labels: Exterior Length, Dry Weight, Sleeps, Slides, Axles, Fresh Water, Gray Water, Black Water
- Use the same label wording on every listing. The Shop page’s Sleeps filter reads from the Sleeps spec, so spell it exactly “Sleeps.”
- Drag rows by the handle on the left to reorder them.
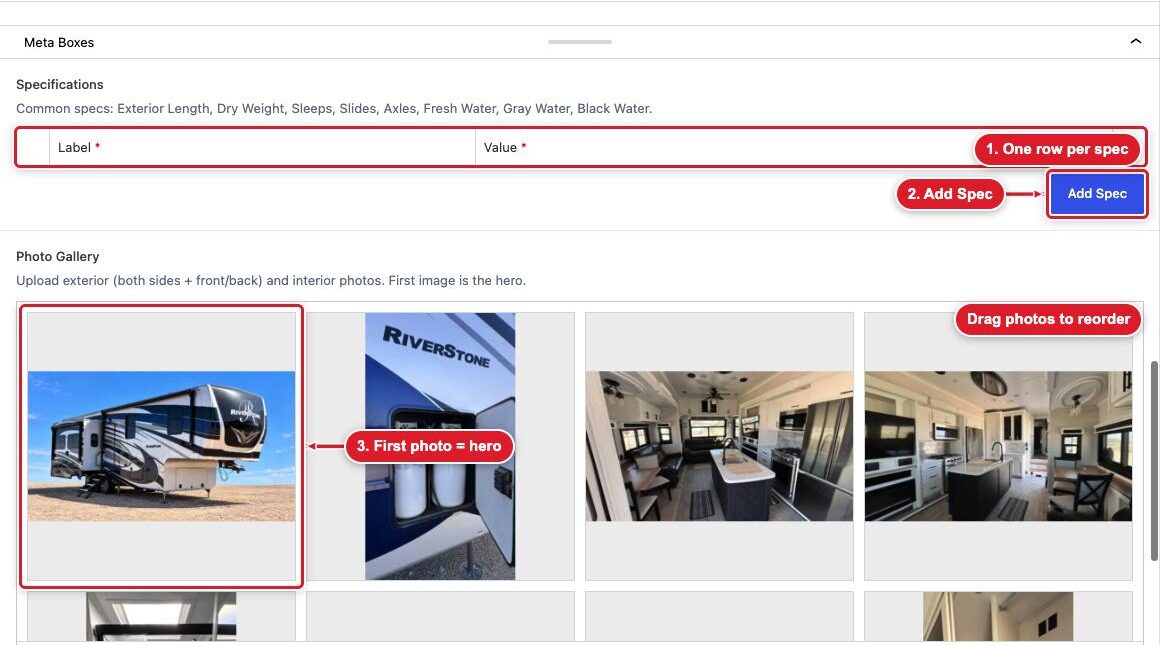
Photo Gallery
- Click Add to gallery and upload exterior photos (both sides, front, and back) and interior photos.
- The first image is the hero photo on the listing. Drag thumbnails to change the order.
- Use landscape (horizontal) photos so the gallery stays consistent.

RV Types
The main types are Boats, RVs, Trailers, Trucks, and Other. Use Other for anything that doesn’t fit the rest, like a hunting blind. RVs are broken into styles: Fifth Wheels, Motorhomes, Pop-Ups, Toy Haulers, Travel Trailers, and Truck Campers. For an RV, check its style (for example, Fifth Wheels).
Edit or Remove a Listing
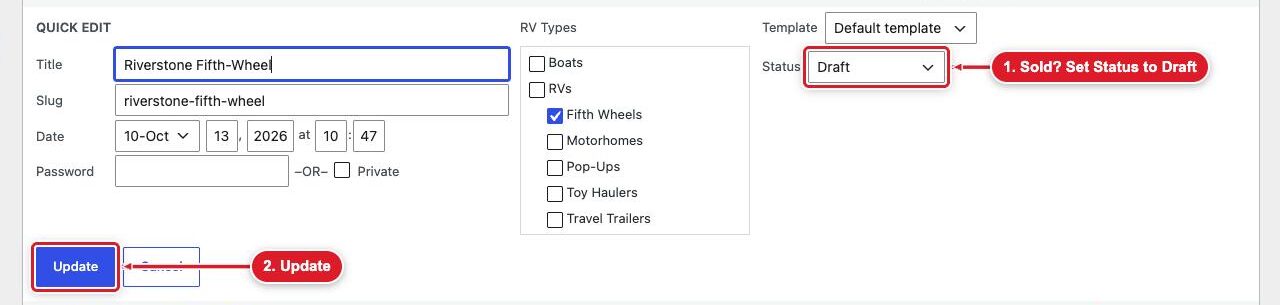
- Go to RV Listings, hover over the name, and click Edit. Make your changes and click Update.
- When a unit sells, change its Status to Draft instead of deleting it. This removes it from the site but keeps it on file in case the deal falls through or you get a similar unit to list.
- Uncheck Featured on Homepage for sold units so the homepage stays current.
Site Settings
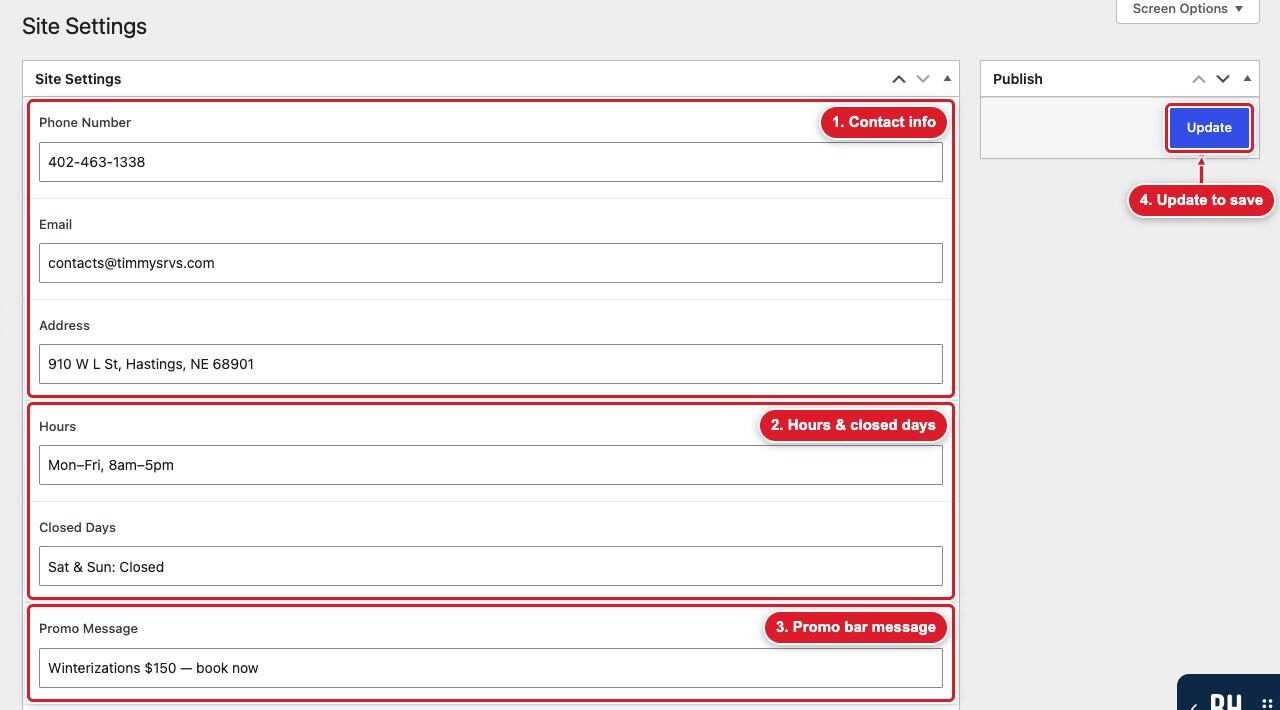
Site Settings holds the information that repeats across the site. Change it here once and it updates everywhere it appears: header, footer, Contact page, and Service pages.
- In the Dashboard, click Site Settings.
- Update any of the fields below.
- Click Update to save.
Contact & Hours
- Phone Number, Email, Address
- Hours: Your regular weekly hours
- Closed Days: Holidays or other days you’re closed
Promo Message
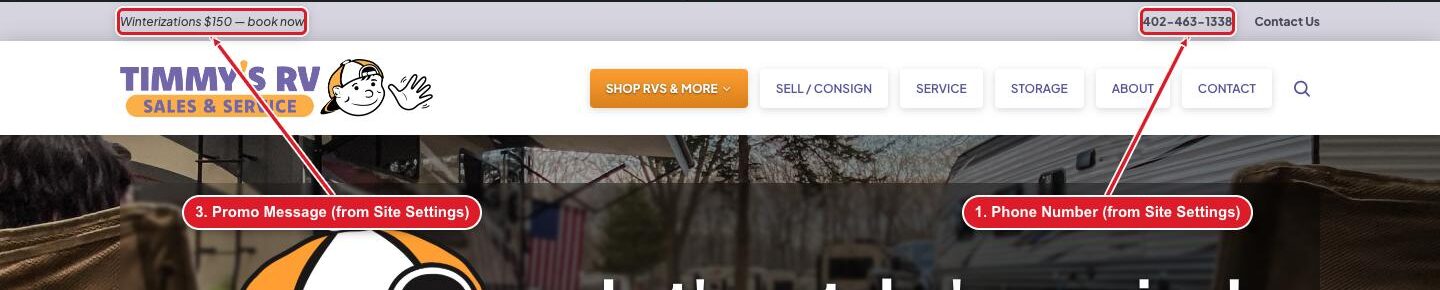
The Promo Message runs in the bar across the very top of every page. Keep it short. Example: “Winterizations $150 — book now.” Clear the field to remove it.
Links
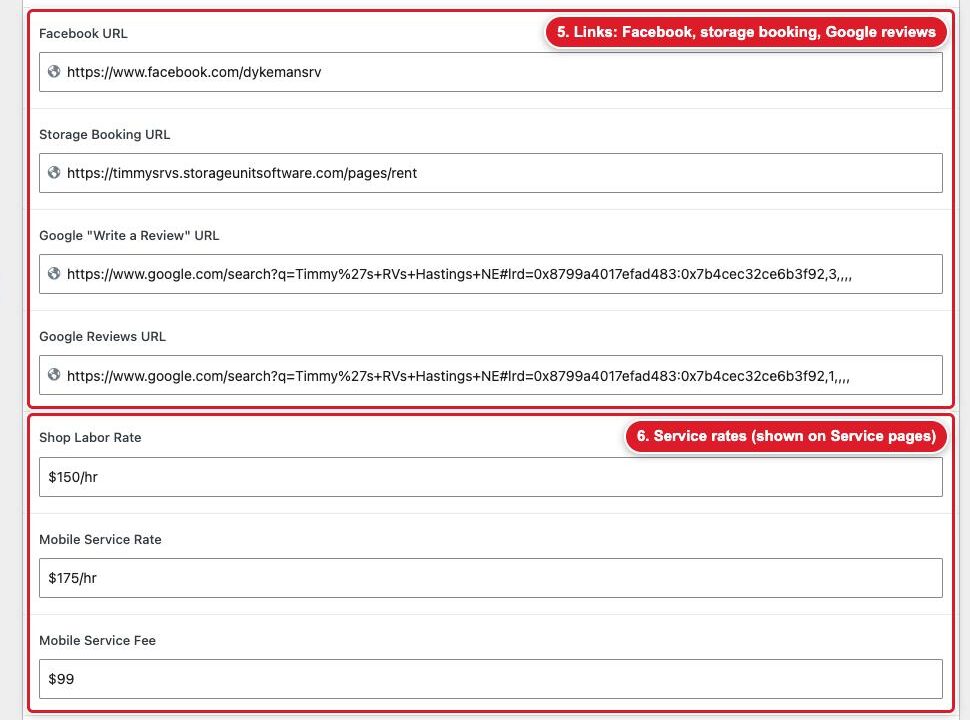
- Facebook URL
- Storage Booking URL: Where the Storage page sends visitors to reserve a spot
- Google “Write a Review” URL and Google Reviews URL: Used by the “Did we earn a thumbs up?” section
Service Rates
- Shop Labor Rate, Mobile Service Rate, Mobile Service Fee: Displayed on the Service pages. Update these when your pricing changes.
Images
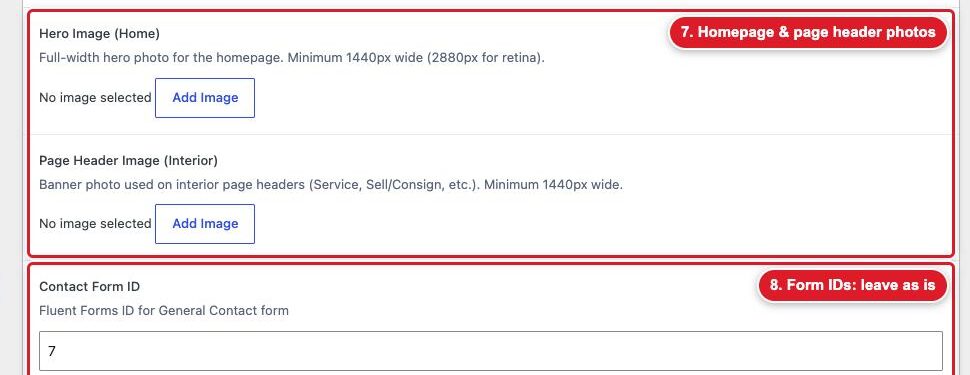
- Hero Image (Home): Full-width homepage photo. Minimum 1440px wide (2880px for sharpest results on high-resolution screens).
- Page Header Image (Interior): Banner photo on interior pages like Service and Sell/Consign. Minimum 1440px wide.
- Avoid photos with text in them. Page titles are placed over the image automatically.
Form IDs
Contact, Sales, Service, and Employment Form IDs connect each page to its form. Leave these as they are.
Page Fields
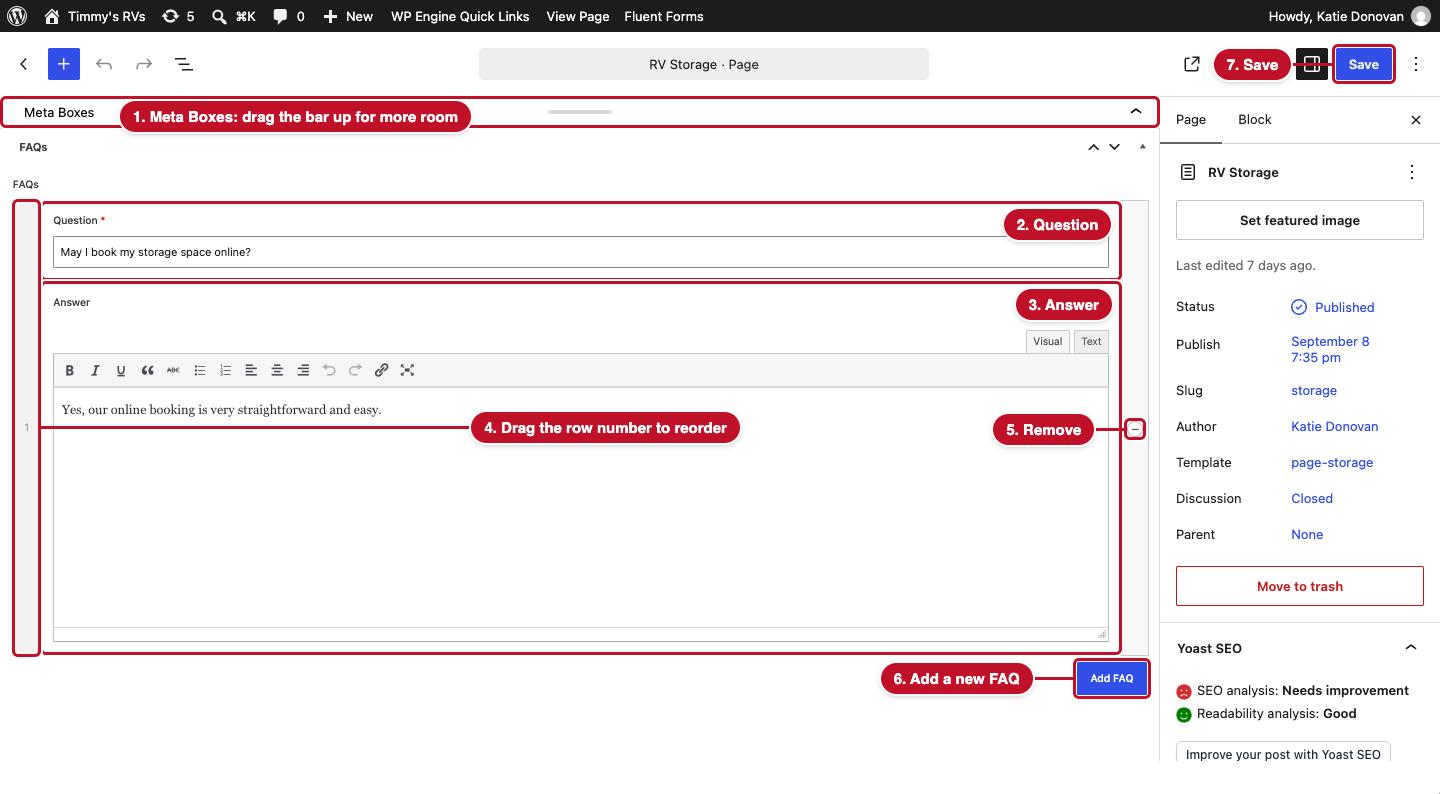
Some of your main pages have extra fields that control specific sections, like FAQs, storage prices, and the team. These fields sit in the Meta Boxes area at the bottom of the page editor, below the content.
Edit Page Fields
- In the Dashboard, go to Pages, hover over the page name, and click Edit.
- Scroll to the Meta Boxes area at the bottom of the screen. If it’s collapsed, click it or drag its top edge up to make it bigger.
- Make your changes in the fields (see the list below for each page).
- Click Save at the top of the page.
Lists of Items
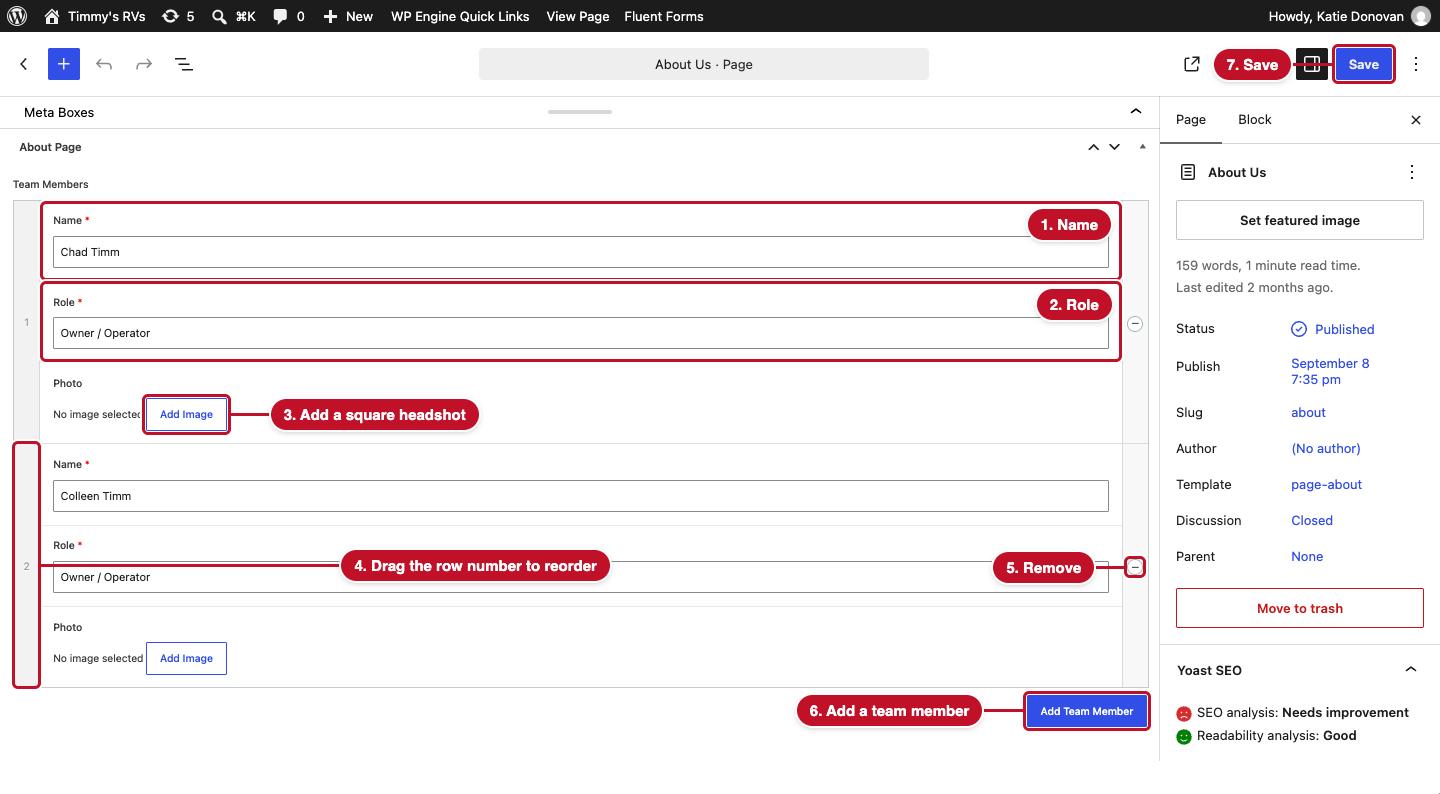
FAQs, storage units, team members, and job listings are lists. Each item in the list is a row with its own fields.
- Add an item: Click the button below the list (for example, Add FAQ). New items are added to the bottom.
- Reorder: Drag a row by its number on the left. Items appear on the site in the same order.
- Remove an item: Hover over the row and click the minus (–) icon on the right.
Which Fields Are on Which Page
Sell / Consign and Service
- FAQs: Each FAQ has a Question and an Answer. The Answer has a small toolbar for bold, italic, and links. These show in the FAQ section of each page.
Storage
- Promo Banner: The badge above the pricing cards. Example: “FIRST MONTH FREE!”
- Promo Fine Print: The small note under the promotion. Example: “*First time customers only”
- Storage Units: One pricing card per unit type.
- Unit Name: Example: “12′ x 50′ Covered RV Parking”
- Monthly Price: Include the dollar sign, like “$120”. “/mo” is added for you. Leave it blank if the unit is only rented by the year.
- Annual Price: Required. Include the dollar sign, like “$1,300”. “/yr” is added for you.
- Annual Strike: Optional original price, shown crossed out next to the Annual Price, like “$1,440”. Leave it blank for no sale price.
- FAQs: Same as above.
- Prices here only change the website. Update your booking system at the same time so the prices match.

About
- Team Members: Name, Role (for example, “Service Director”), and Photo. Use a square, well-lit headshot so the team cards line up. The current team’s headshots are built into the site, so their Photo fields are empty. Uploading a photo replaces the built-in one. A new team member without a photo shows an empty frame.
- Job Listings: Title, Type (for example, “Full time”), Location, and Link. The Link is where the “View” button goes. Leave the Link blank to hide the button.

Basic Page Management
Your main pages (Home, Shop, Sell/Consign, Service, Storage, About, and Contact) are custom built into your site’s design, and most of what they display is controlled by RV Listings, Site Settings, and Page Fields. For other wording changes to those pages, email IdeaBank (see Notes).
Simple text pages, like the Privacy Policy, are edited in the WordPress Block Editor.
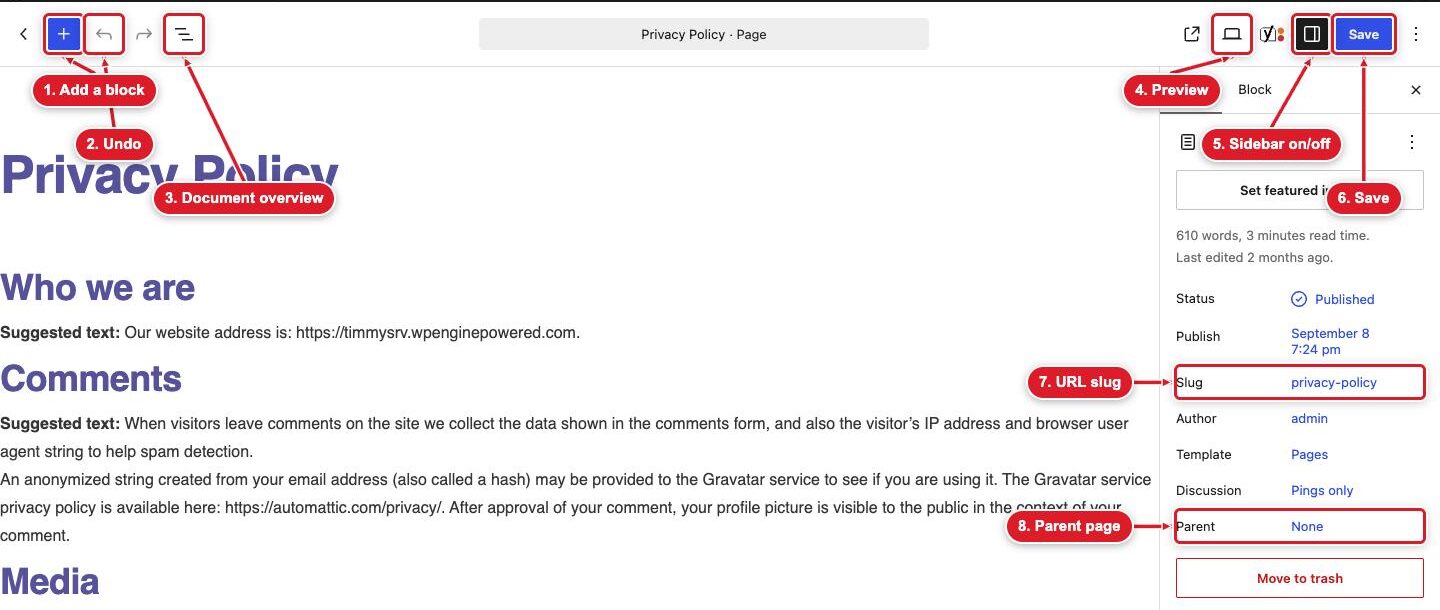
Top Toolbar
- Block Inserter (+): Add a new block (paragraph, heading, image, list, etc.)
- Undo / Redo
- Document Overview: See every block on the page as a list
- View / Preview: See the page as visitors will
- Save / Update: Save changes
- Settings: Opens and closes the sidebar
Sidebar
The Sidebar appears on the right side of the screen. The Page tab controls the page as a whole. The Block tab controls whatever block you’ve clicked on.
Page Settings
- Page Title: The main name of the page.
- Slug: The part of the web address (URL) that comes after your domain name.
- Parent: Organizes pages into a hierarchy.
- Example: Mobile RV Service is a child page of Service, so Service is set as the parent.
Edit Page Text
- Open the page and click directly on the text you want to change.
- Type your changes.
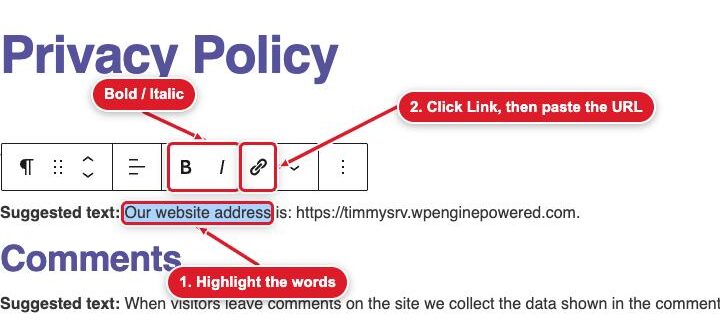
- Use the small toolbar above the block for bold, italic, and links.
- Click Save at the top of the page when finished.
Adding an Image
- Click the + button and choose Image.
- Click Media Library to choose an existing image, or Upload to add a new one from your device.
- Add Alt text describing the image (this is read aloud to visitors using screen readers).
- Click Select, then Save.
Adding a Link
- Highlight the word(s) you want to turn into a link.
- Click the link icon in the block toolbar (or press Ctrl+K / Cmd+K).
- Paste or type the URL. For internal links, start typing the page name and choose it from the list.
- Press Enter.
External links (other websites): Open in new tab.
Form Entries
Every form submitted on the site is saved, even if an email notification gets lost.
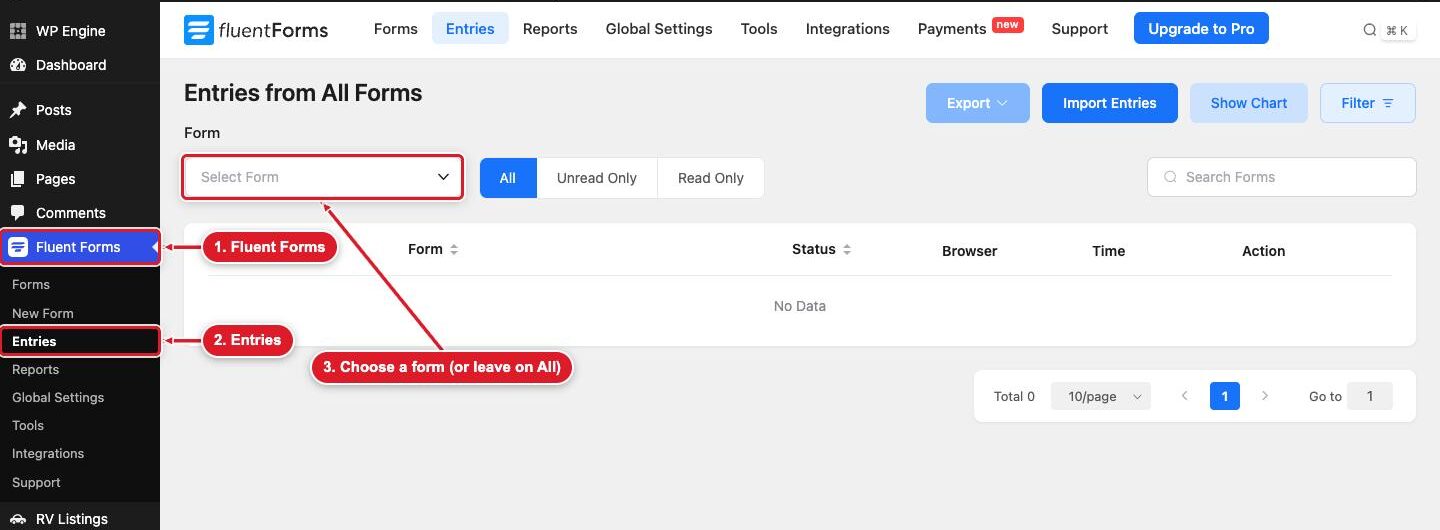
- In the Dashboard, go to Fluent Forms > Entries.
- Choose a form from the dropdown (General Contact, Service Request, Sell / Consign, or Employment Application), or view all.
- Click an entry to see the full submission.
Styling
Maintaining consistent styling improves the look, clarity, and professionalism of your website.
Header 1
Header 2
Header 3
Header 4
Header 5
Header 6
Consistent heading use improves readability.
- Avoid using Heading 1 – Reserved for the page title only
- Heading 2 – For main sections
- Heading 3 – For subsections
Notes
- Quick Edit (hover over a page or listing in the list) lets you change:
- Title
- Slug: URL
- Date: When published
- Parent page
- Order: Leave as is
- Template: Leave as is
- Status: Published, Pending Review, or Draft
Support
Please email support@ideabankmarketing.com for assistance and bug fixes.
Image Preparation
When uploading images to the system, it will automatically adjust the image to web standards.
- If need be, you can crop the image within the system. This will override the original image.
- Images are found in the Dashboard by going to Media > Library.
- Homepage hero: 1440px wide minimum (2880px recommended)
- Interior page header: 1440px wide minimum
- Listing photos: Landscape orientation